One way to quilt
 Of course there's never just one way to tackle the quilting of any quilt. Here's a bit of info about how I approached 'I'll be Waiting'.
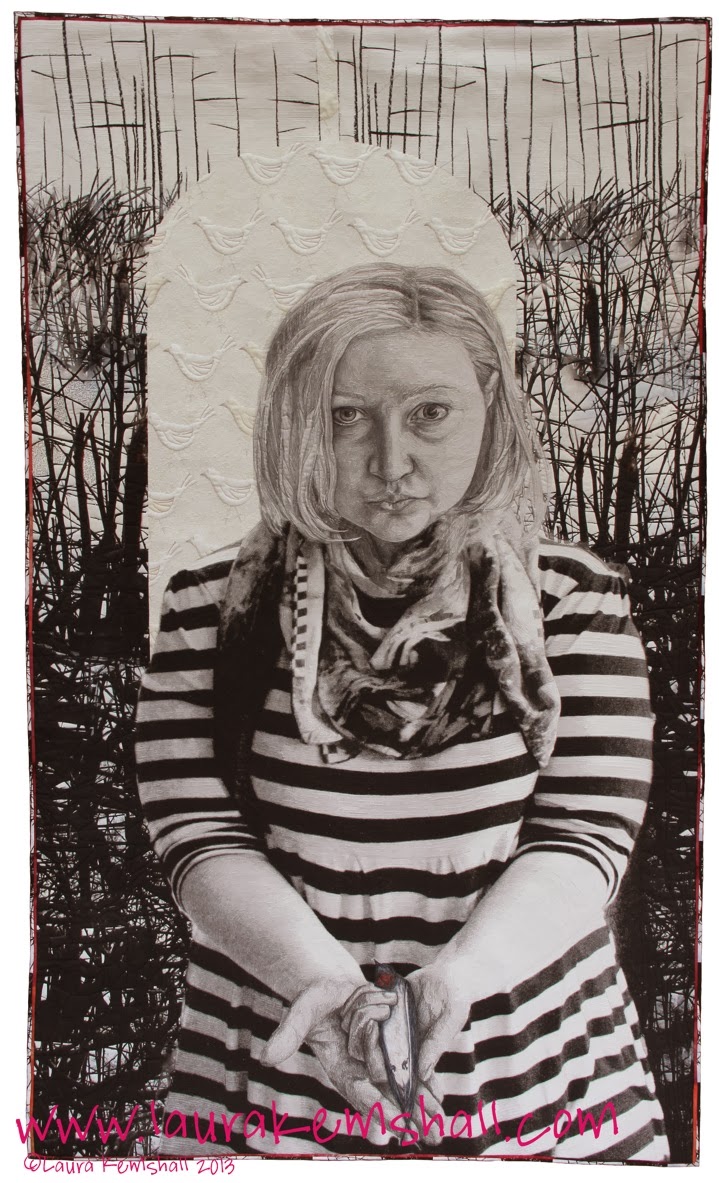
It's a digital print on cotton, wholecloth, no piecing, no appliqué, everything you see is part of the print. The artwork was put together in Photoshop, but more about that another time.
It's backed with cotton fabric and the wadding is cotton/polyester blend. The whole thing is quilted freehand on a Gammill longarm, but it's just the same technique as free motion quilting on a regular sewing machine.
I took a few photos as I worked:

Above: Here's the fabric being printed. The grey blur is the printhead whizzing side to side. After the printing the fabric is steamed, rinsed, washed and pressed.
If I hadn't been working on a longarm I would have begun by quilting the face which not only happens to be near the centre of the work (it's usually a good idea to work from the middle out), but I reckon the success of the quilt probably hinges on the face. If I bodged the face then no amount of nice background quilting would have saved it.
But, working on a longarm dictates quilting from top to bottom so I began with the sky and hedge. These hedgy spikes were originally drawn with charcoal on paper, don't you just love how authentically the digital print captures that? Rather than outlining the spikes I've quilted the background up to them. This area of fabric is white and I've used a soft white thread to make the stitching almost disappear. The quilting here is closely worked back and forth to have the effect of flattening the background to the point that the spikes look as though they might be trapunto.


Moving down the quilt the next area is the cage section which is filled with small birds. These have a discreet peachy colour and again instead of outlining, I've quilted the background voiding them. This angular vermicelli quilting is closely spaced - look at how much fullness there is in the area still to do. It just goes to show how lots of quilting shrinks a piece!


The next stage was to do the hair. Quite a quick section to do, quilting fast simply following the flow of the hair working in sections.

Next it was my favourite section to do, the face.

I usually begin with doing the eyes. They are one part of the face where you have a real outline, everything else is not so clearly defined. I select a range of threads in shades of blue greys, I can't recall exactly, but at least 10 different ones to achieve the colour matching needed. You learn to rethread the machine really fast with this sort of quilting!

I draw with the needle to reinforce the lines of the eye. This is an opportunity to add clarity or to modify lines in the print. I find it best to jump about quilting the darkest areas of the face first. Then switch to the palest thread in the selection to quilt the highlights and then work through all of the values in between. Essentially it's just a case of trying to match the colour of the thread to the fabric below so that the stitching buries into the surface and blends.

I use contour quilting for faces and arrange the contours so as to describe the form of the face changing direction for example on the nose compared to the forehead.

While the quilt is figurative, when working at a largish scale like this, when you get up close many areas such as the shirt, scarf and hedge have abstract qualities. When it comes to quilting again it was just a case of matching the colour and value of the thread to the fabric. The scarf only required about 4 changes. I used contour quilting again to mimic the fluidity of the folds of the scarf.

I had purposely worn a stripey shirt for the photos used in the creation of the original artwork as I knew it would give me something more interesting to quilt than a plain one. Here I'm following the stripes with closely space very linear quilting. I interrupt the contours wherever there's a ripple in the shirt to reinforce the illusion that it's a 3D bit of fabric curving and draping over a body.

The hands were amongst the final things to be done. Contour quilting is ideal for the palms of hands and I love stitching so as to suggest fingerprints on the tips of the fingers.

Once the hands were finished the bird was finally stitched and completed with the addition of a tiny bit of colour using Derwent Inktense pencils.

And it was done! A fun piece to quilt with lots of different areas to do which always helps keep it interesting to work on.
Thanks for reading,
Laura
x
Astounding! I am especially astounded by your quilting of faces and hands, attributing such a great 3D feeling through stitch.
ReplyDeleteHow wonderful to 'walk' us through your process! Of course, your work always amazes us and this was a treat to see you complete the process! Thank you!
ReplyDeleteThis is absolutely gorgeous! I am amazed at what you can do with thread!!
ReplyDeleteYou're work is absolutely amazing!!! Do you have any idea how many hours this piece took to quilt?
ReplyDeleteYou make it all seem so easy, but even with a longarm, I know this took an immense amount of work. Wonderful
ReplyDeleteWow! What a stunning piece! And how generous of you to share the process :)
ReplyDelete